tl;dr you may jump into this line if you are just interested in knowing the solution.
Integration scenarios are most challenging because you have to consider different technologies, specifications and of course the limitation of the OutSystems platform but gone are the days that you have to think about your own security flow. There are lots of specification available online to give you a head start on the security specification needs to be considered (e.g. IETF and OWASP). I am not a security expert myself but with tons of references online, I can help spread out their good content.
As a Technical Architect in OutSystems, I am involved in various technical tasks and one of those is to do code review to different customers. The general way of doing this task is through a static code analysis tool to aggregate all the findings and present it to customers. While this has been an effective way of collating review recommendations, it would still miss things that an engineer would commit outside the common patterns defined. It’s important for us to be detailed in doing a review by skimming through the code and checking things that can be improved.
One of the customers I reviewed made use of grid that will be pulling data from REST API.

The REST API implements token-based authentication to secure the data from being accessed by unauthorized users. After reviewing the code, there are three things that I noticed:
- When token is expired, it’s lifespan is extended instead of generating a new token — According to IETF OAuth specs — The authorization server should issue a new access token when the token is expired.
- Tokens are exposed behind the html code making it vulnerable to Cross-site scripting (XSS). While there are built-in ways to mitigate XSS in OutSystems, it will add another layer of security if tokens are stored securely.
- The code relies on the Login action to validate roles thus making the request to be stateful from server perspective because it needs to create session.
#1 is straightforward to fix. Simply by making the consumer aware of the expiration so that it can request new token. What I will be covering is #2 and #3 problem which focus on a strategy in storing the token securely and making the API stateless.
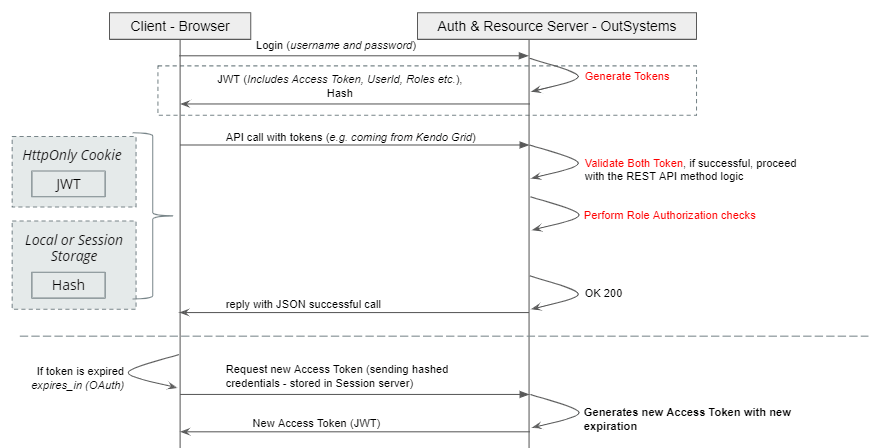
We can make use of HTTP only cookies to securely store the Token in the browser and this forge component helps you achieve this. Using the HttpOnly flag when generating a cookie helps mitigate the risk of client side script accessing the protected cookie. However, this type of cookies are not secure from Cross-Site Request Forgery (CSRF) attack and this is where another layer of protection arises. The strategy is to have another token that will be stored in session or local storage since both of these storage approaches are only accessible on the same origin protecting it to CSRF attack. Combining both will protect the resource hosted in REST API from both attacks.
By introducing JSON Web Token (JWT), we relieve the stateful nature of the authorization (#3 problem). JWT defined a self-contained way for securely transmitting information between parties as a JSON object. It will act as a container for the information needed for the user to be authorized. Fortunately, we have an available forge component — JWT to help us do the encoding and decoding. Asymmetric is the suggested way of encoding for REST API since they offer public and private key for signing the token using (using RS256, RS384, RS512). Here’s a blog from the creator himself that describes the process of making use of the component.
Here’s a picture that shows the solution altogether:

The OAuth sample from forge can give an idea on how to produce a token. The sample doesn’t cover JWT but it should give a head start on OAuth.
Here’s how the client-side script will look like:
fetch(‘https://johnalvin-salamat.outsystemscloud.com/SandboxWeb/rest/Test/Get’, {
headers: {
‘Authorization’: ‘Token ‘ + window.sessionStorage.getItem(‘token’), // Hash Token
‘Content-Type’: ‘application/json; charset=utf-8’,
‘Accept’: ‘application/json’,
}).then(function(response) {
return response.json();
})
And here’s from the API side:

E = 19, N = 17, P = 1
Formula:
E — N + 2(P) = CC
19–17 + 2(1) = 4
The result 4 here means there are 4 scenarios present on this server action which makes it complex. My rule of thumb is to unit test when CC > 2. One other tip is that the result is an indicator of the minimum test cases you need to get good coverage. Checkpoint can be done during a code review process to pinpoint whether a code qualifies for a test and how much tests it needs.
Getting the team to be in a mindset of creating automated tests could be rough in the beginning but as they build few tests and get comfortable with it, cadence will improve and it is more incorporated within the development process. So CUT (Code and Unit Test) the chase and start writing tests!
John Salamat
Technical Lead
Connect with John on LinkedIn


