
What makes an excellent coding style
Code is language. Like any language, there’s a writer, and there are a potentially large number of readers. The burden of clarity lies with the writer, and the burden of attention lies with the reader. An excellent coding style increases the clarity of the code and reduces the burden on readers. It will, of course, increase the burden on the writer, but that pays off very quickly. There are 3 principles for an excellent coding style:- It emphasizes the intention of the code.
- Reading it is a predictable and natural process.
- It avoids misleading notation.
Different languages will have different coding styles, but only because different readers disagree on what best depicts intention, what feels more natural, and what is misleading. Java and C# are very similar languages, but they have slightly different coding styles because their readers disagree on a few of these points.
There’s no single best coding style. However, don’t impose guidelines on a team without considering the preferences of each individual. I am pretty sure that most will disagree with some of my guidelines. Heck, even I may differ in a year or two. The critical thing to keep in mind is that the team should own a code style guide, and it should be flexible to adapt to new language constructs or changes in company culture. You should use my guidelines as a starting point, but feel free to adapt them to your team.
Guideline 1 — down is progress
Downward arrows and downward alone lead you to the goal of the action.
When reading a book, you know that you’re approaching the end of the book as you finish a paragraph and move down to the next. That’s the natural reading direction agreed by all of us, even by different cultures. That’s as natural as it gets!
The same should happen in code. With every downward movement of your eyeballs must come the sensation of progress towards the goal.

Interestingly, all text-based programming languages have this guideline built into them. Code always flows downward on Java or C#. There’s no need to even state the guideline.
But it’s different in OutSystems, and developers are tempted to be creative on which direction to layout the code. A classic example is the “snake” pattern, where code is laid out alternating left-to-right and right-to-left rows. This comes naturally from developers working with wide screens, as they try to fit as much code as possible into their screen.
Here’s the problem with snakes: they bite. These will bite the unfortunate developers that happen to work on a smaller screen.
Let’s go back to our principles and evaluate how poor this layout is. It does not emphasise your code but only how big your screen is. And it requires you to alternate reading directions, left-to-right, then right-to-left and back again. Very unnatural, unless you are Leonardo da Vinci. Stick with vertical flows. If you don’t like leaving half of your screen blank, hey, here’s a nice thing you can do with it: document your code.Guideline 2 — branch to the right
Choose the most important branch of an if, and branch it to the right.
If nodes usually have a “most important” branch and a “less important” one. By “most important”, I mean the branch that is expected to be executed more often or the branch which is simply more important in terms of business value. This branch should move to the right, and the other branch should continue straight down.
By setting the most important of the two branches aside, we’re emphasizing it. We’re punctuating it and giving it more space to be written.
Can’t decide which branch is the “most important?” Choose the most complex branch.
Are both branches equally important and equally complex? Do you need a guideline for everything? Just flip a coin or something!
I should add that some developers prefer to split both branches in downward diagonals, called a “checkers” pattern if both branches are equally important and symmetric. I find this works well for short branches.
Nested ifs and indentation
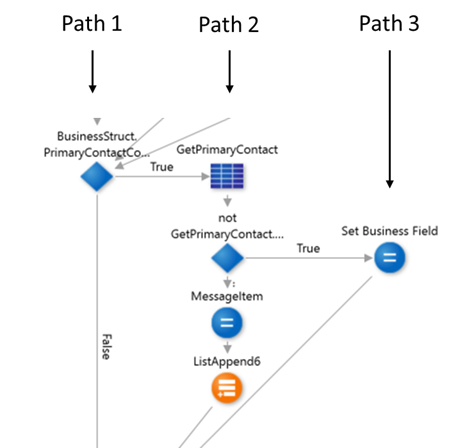
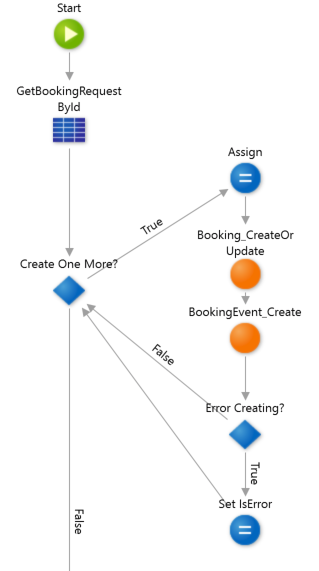
When laying out nested ifs, apply the same guideline at each level. You will find this creates multiple vertical code paths, each path related to a particular possible execution. For example, in the picture below, we can see there are 3 possible execution paths. Path 1 doesn’t execute anything, path 2 appends a message item to a list, and path 3 sets a business field.
It’s clear at a glance that only one of these paths will execute. It’s also clear that Path 3 is considered the “most important” path, meaning that it’s the one that produces the most value.
This effect results in a vertical alignment that is very similar to that of indentation. So let’s define the indentation level of a node as the horizontal separation between itself and the leftmost branch. The leftmost branch, in case you’re wondering, is always aligned with the Start node. So the indentation is just the horizontal displacement between a node and the Start node.
Example of a nested if, with execution paths emerging from the vertical alignment. This effect results in a vertical alignment that is very similar to that of indentation. Let’s define a node’s indentation level as the horizontal separation between itself and the leftmost branch. The leftmost branch is always aligned with the Start node. So the indentation is just the horizontal displacement between a node and the Start node. For example, the “Set Business Field” node above has an indentation level of 2, because it is separated from path 1 by 2 horizontal spaces. Like in traditional programming languages, the indentation level is equal to how many ifs and loops are nested. You might have learned this; too many nested ifs and loops indicate poor architecture and code abstraction. So well-architected code will naturally be vertical, reinforcing Guideline 1.True vs False
Some teams decide to differentiate the True and False branches, usually by specifying that the True branch should always move down. I have avoided any distinction between True and False, and my guideline is simply based on “most important” branch, which could either be True or False.
I need to explain why I took that route. So here are my thoughts on the discussion. And remember: there’s no single best coding style, so if you disagree with my reasoning, please adapt the guidelines to your team.
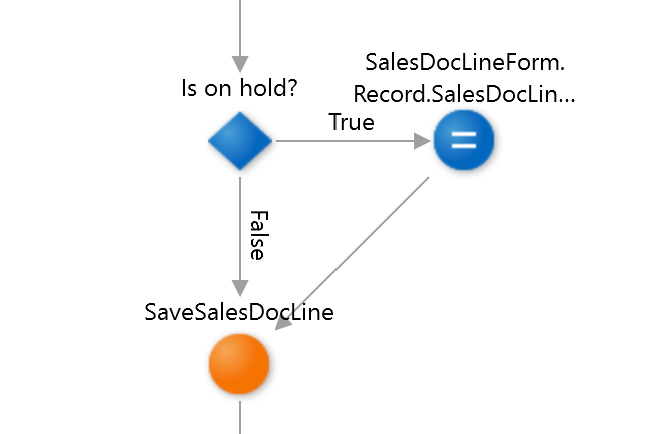
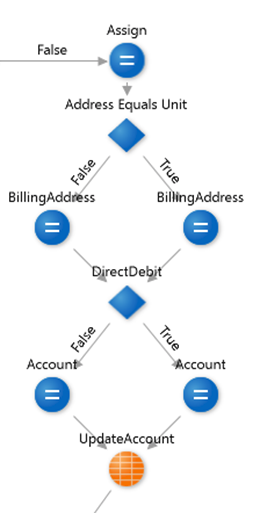
Often one of the branches of an if node is empty. You can see an example in the above image. In this case, it makes sense to me that the empty branch continues down and the non-empty branch moves right.
If we want all True branches to move down, we would need to swap the branches in the image and negate the condition to “Is not on hold?”. And this is the problem I have with that rule: it forces the developer to change the code to comply with it. I would rather leave at the developer’s discretion which condition reads better.
I have gone through the arguments for keeping True down, and they all seem related to validations or exception handling. I think those scenarios are specific enough to have their own set of guidelines, so let’s talk about them.
Guideline 3 — exceptions to the right
Exceptions branches to the right, even if it’s not the “most important” branch.
Let’s see what would happen if we applied Guideline 2 to a code that handles validations or exceptions.

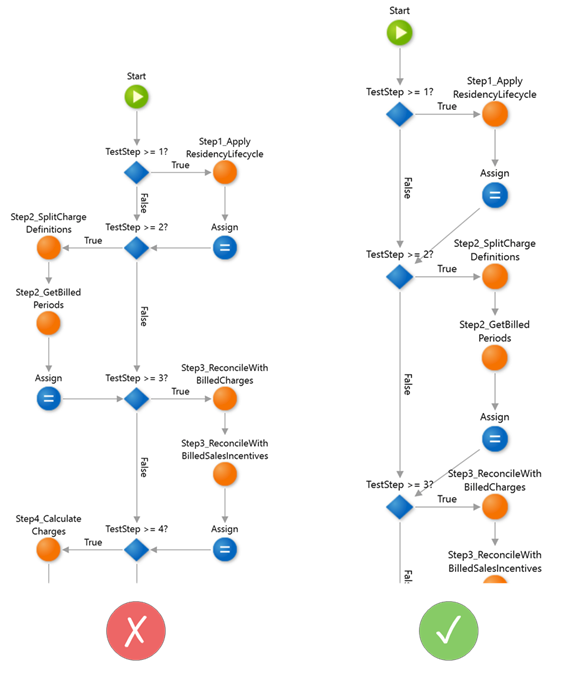
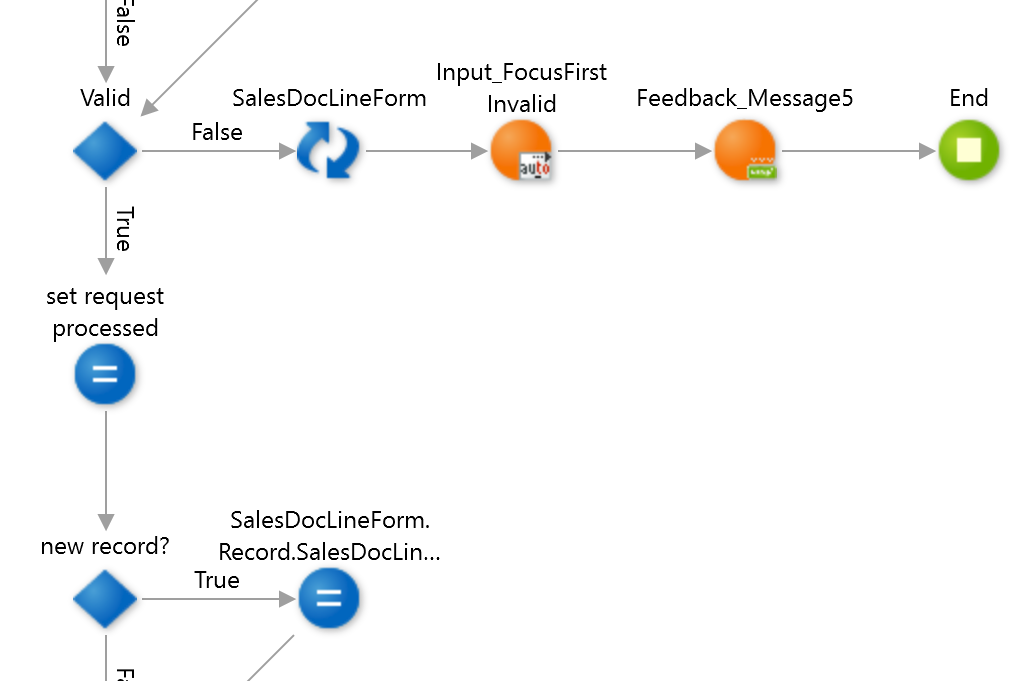
Let’s take the code above, in which there are 3 if nodes. According to Guideline 2, we should branch the most important branch to the right. I think you will agree that the most important is the one that continues down on all branches of the code above. So it seems, we have a violation of Guideline 2.
However, to blindly apply Guideline 2 here means that we end up with the monstrosity on the right. All nodes have the most important branch to the right, but it doesn’t look natural, nor does it emphasise anything. And the code is primarily horizontal now. Outrageous!
So, in this case, we should stick with the pattern on the left. We can generalise this further by saying that exceptional code branches to the right, regardless of its importance. We define exceptional code by any short if branch terminating in an End node or Raise Exception node.
Horizontal exceptional code
You might have seen code like the one above. This is an example of an exceptional code found in a Save screen action and related to form validations. The typical layout is horizontal, as shown above.
Doesn’t this violate Guideline 1? Let’s review what it says: downward arrows, and downward alone, lead you to the goal of the action.
The words “goal of the action” in the definition were chosen carefully. We should first ask: what is the goal of the Save screen action? It should be fairly clear that the goal is to persist user input. Now, the next question is: does the exceptional code move toward that goal?
No, that code doesn’t contribute to reaching the goal. Therefore, in this case, we are not violating Guideline 1, and we are not forced to vertically layout the validation code.
It turns out exceptional code is exceptional!
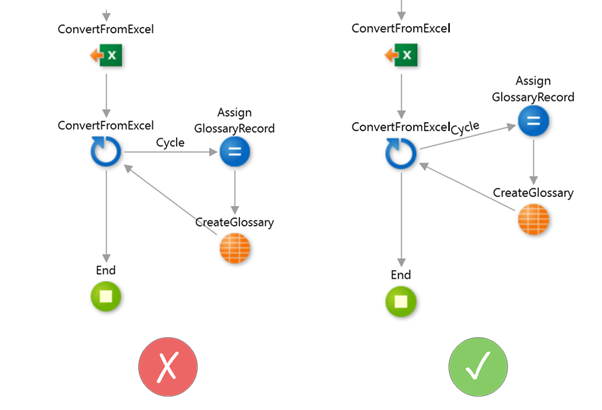
Guideline 4— cycles start on a diagonal
Start a for each cycle in an upward diagonal to the right.
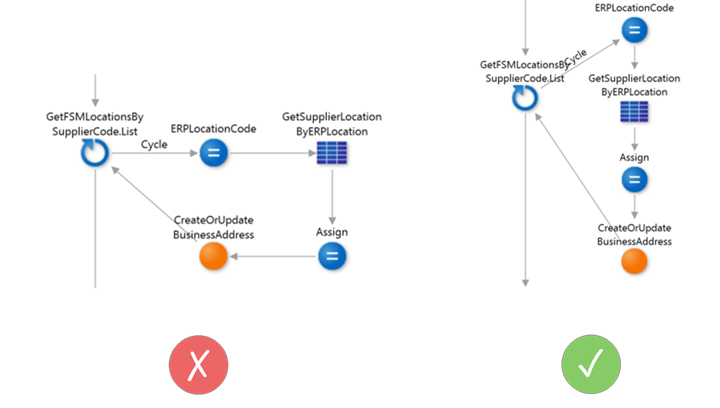
A for each starts a loop in your code that might execute several times. It can be thought of as a branch that loops back on itself. Therefore, the same concept of indentation should apply here, and the code should be placed to the right, according to Guideline 2, and flow vertically as specified in Guideline 1.
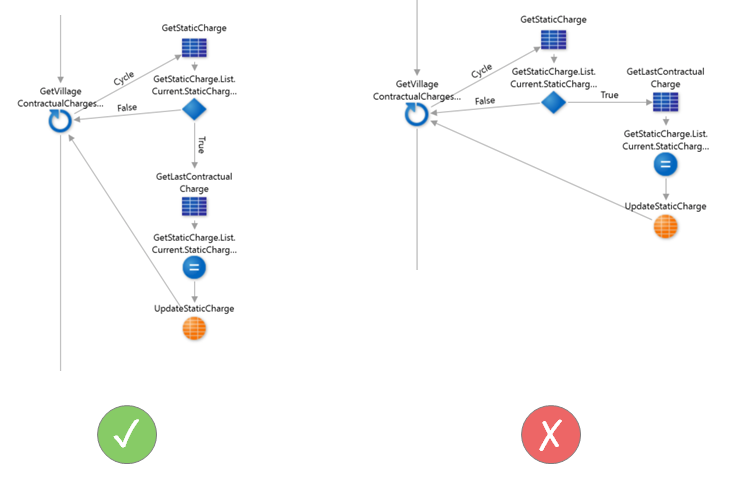
To these rules, we add one more, that the first node of the for each should be placed above the for each node itself, as illustrated in the picture below.
Why start the loop diagonally? I have to be honest; my best answer is stylistic. I do this to give loops a distinct look.
I have seen other developers use the same layout, so it’s not just my personal taste. But I have also received the feedback that this contradicts Guideline 1, because there’s an upward movement. My best defence is that in any loop there will always be an upward movement.
One functional difference is that this layout brings the last node up and closer to the for each, which minimises the distance between all nodes in the loop. The difference is not much, but it’s easier to see on smaller loops.
It’s also important to remind that cycles can be created using if nodes, instead of for each nodes, for the equivalent of a while cycle in Java or C#. In this case, having a different layout applied to the if node helps distinguish it, and highlights the cyclic nature of the code, even in the absence of a for each node.
Cycle continuation
Some cycles have nested if nodes, where one of the branches lead back to them for each node. These are called continuation if nodes. The continuation branch must move to the left; there’s no other option. But what should we do with the other branch?
If we follow Guideline 1, we should continue to lay out the code vertically. If we follow Guideline 2, we should branch to the right. It seems in this case; there’s no way to fulfil both guidelines, so we end up using Guideline 1 and give preference to a vertical layout.
Guideline 5 — avoid overlapping arrows
Avoid overlapping arrows, even if it requires violating another guideline.
This guideline should not surprise you; most developers already follow it. The reason why we avoid overlapping arrows is to have a more straightforward visual flow.
In some circumstances, following this guideline requires you to create empty nodes to direct the flow. The following example hopefully makes it clear.
I use a white space in the label of empty assignments, making it look like it lacks a label. Some other teams use the “NOP” label, indicating there’s no operation in the assign. Other teams use an arrow symbol such as “>” to indicate the assign can be skipped. All of them are valid conventions.
I have also had the feedback that empty assigns are artificial and might be a misleading notation to users who are not familiar with it. I completely agree. Hopefully, in the future, we’ll be able to avoid overlaps without abusing assigns. For now, it’s the best tool we have.
Guideline 6 — align with intent
Intentionally align nodes that relate to each other.
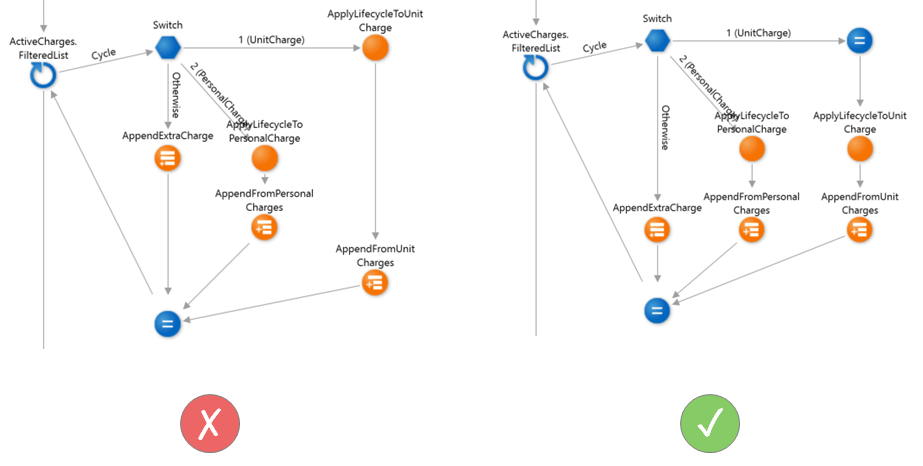
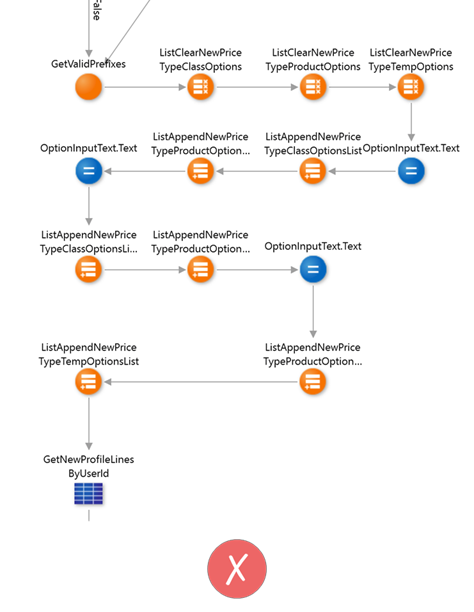
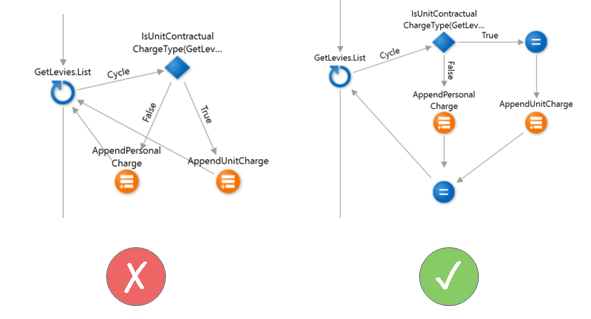
If two branches execute similar code, highlight that relationship by keeping the related nodes aligned. This intentional alignment will convey at a glance what is similar, and what is different, between the branches.
This strategy also makes it easier to perform changes on all branches. Suppose that, in the example above, we need to introduce a new assign node before the append nodes. It’s far easier to select all append nodes with a rectangular selection when they are already aligned.

Exception handlers
Exception handlers can also benefit from alignment hints.
Indeed, an exception handler is a kind of implicit branch that jumps straight from when the exception happens to the code in the exception handler. So, as weird as it may seem, it makes sense to apply Guideline 2. We should branch it to the right.
Align the exception handler to the right of the point where it is expected to happen.
In some cases, this alignment might not be possible. For example, if the same exception can come from multiple places, or if you don’t know where it could come from. In those cases, leave the exception handler in its usual place, aligned with the Start node.
Conclusion
By practising these 6 guidelines, you will be writing OutSystems code that is easy and predictable to read and consistent with other teams.
- Down is progress; Layout code vertically, from top to bottom.
- Branch to the right; Place the most important branch directly to the right.
- Exceptions to the right; Place exceptional code to the right, as if it were the most important branch.
- Cycles start on a diagonal; Start a cycle on a diagonal to the top and right.
- Avoid overlapping arrows; Re-arrange your code to avoid overlapping arrows.
- Align with intent; Keep related nodes aligned.
 Leonardo Fernandes
Head of Technical Delivery
Connect with Leonardo on LinkedIn
Leonardo Fernandes
Head of Technical Delivery
Connect with Leonardo on LinkedIn
